Objective
Go deeper on interface configuration — not just IPs and no shutdown, but also manually setting speed and duplex on links between network devices, adding descriptions everywhere, and cleaning up the switch by disabling any port that isn’t actively connected to something.
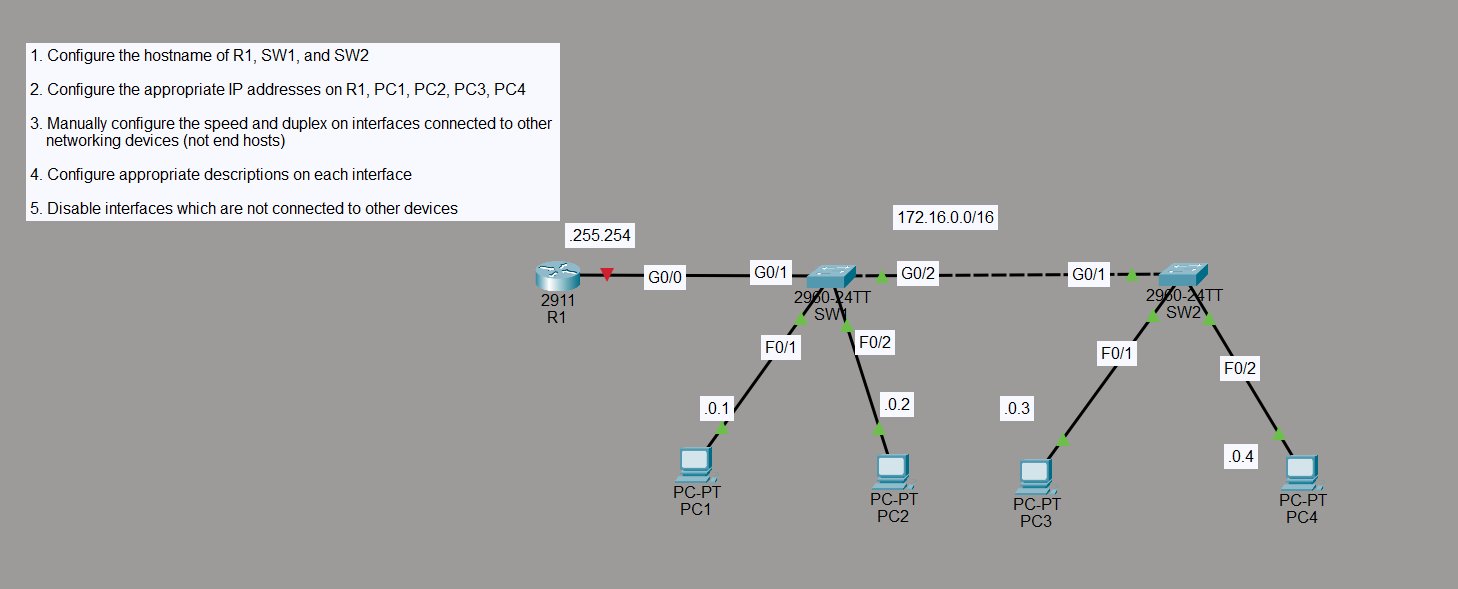
Topology:
- R1 G0/0 → SW1 G0/1 (172.16.255.254/16)
- SW1 G0/2 → SW2 G0/1 (interswitch link)
- SW1 Fa0/1 → PC1 (172.16.0.1), Fa0/2 → PC2 (172.16.0.2)
- SW2 Fa0/1 → PC3 (172.16.0.3), Fa0/2 → PC4 (172.16.0.4)
All four PCs are in the same subnet — routing isn’t needed here, just switching.
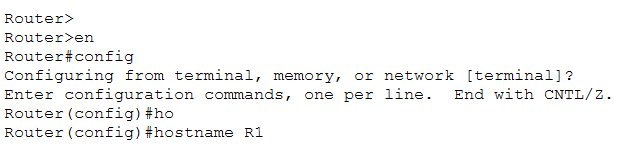
Step 1 — Hostnames
Set hostnames on R1, SW1, and SW2. Same process on all three:
Router> en
Router# config t
Router(config)# hostname R1
R1(config)#
Switch> en
Switch# configure
Switch(config)# hostname SW2
SW2(config)#

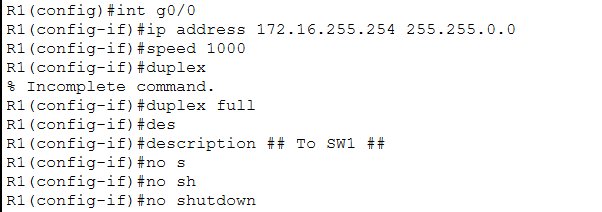
Step 2 — Configure R1 and PC IP Addresses
R1 G0/0 — the gateway for the whole subnet:
R1(config)# int g0/0
R1(config-if)# ip address 172.16.255.254 255.255.0.0
R1(config-if)# speed 1000
R1(config-if)# duplex full
R1(config-if)# description ## To SW1 ##
R1(config-if)# no shutdown
Speed and duplex are manually set here because this is a link to another network device — hardcoding these prevents auto-negotiation mismatches.
PC IP addresses — configured statically via the Config tab in Packet Tracer:
| Device | IP Address | Subnet Mask | Default Gateway |
|---|---|---|---|
| PC1 | 172.16.0.1 | 255.255.0.0 | 172.16.255.254 |
| PC2 | 172.16.0.2 | 255.255.0.0 | 172.16.255.254 |
| PC3 | 172.16.0.3 | 255.255.0.0 | 172.16.255.254 |
| PC4 | 172.16.0.4 | 255.255.0.0 | 172.16.255.254 |
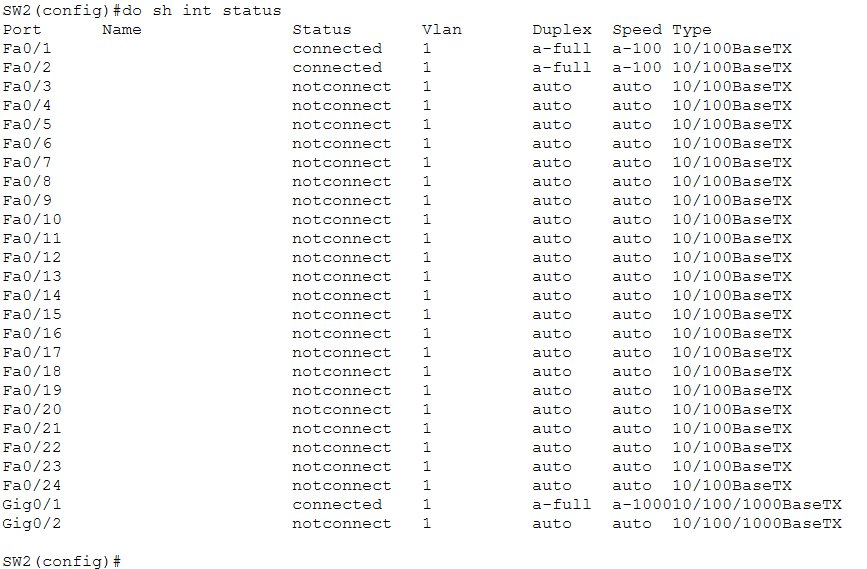
Step 3 — View Interface Status Before Configuring Switches
Before making changes on SW2, check what it looks like out of the box:
SW2(config)# do sh int status
Port    Name    Status      Vlan  Duplex  Speed  Type
Fa0/1           connected   1     a-full  a-100  10/100BaseTX
Fa0/2           connected   1     a-full  a-100  10/100BaseTX
Fa0/3           notconnect  1     auto    auto   10/100BaseTX
...
Fa0/24          notconnect  1     auto    auto   10/100BaseTX
Gig0/1          connected   1     a-full  a-100  10/100/1000BaseTX
Gig0/2          notconnect  1     auto    auto   10/100/1000BaseTX
Fa0/1 and Fa0/2 are connected (PC3 and PC4), Gig0/1 is the uplink to SW1. Everything else is notconnect with no names and auto speed/duplex — messy and a potential security risk since unused open ports are an attack surface.
Step 4 — Configure SW2 Interfaces
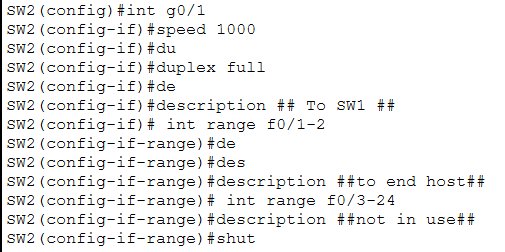
Configure the uplink to SW1 with speed, duplex, and a description. Then add descriptions to the end-host ports and shut down everything unused using interface range:
SW2(config)# int g0/1
SW2(config-if)# speed 1000
SW2(config-if)# duplex full
SW2(config-if)# description ## To SW1 ##

SW2(config-if)# int range f0/1-2
SW2(config-if-range)# description ##to end host##

SW2(config-if-range)# int range f0/3-24
SW2(config-if-range)# description ##not in use##
SW2(config-if-range)# shutdown
interface range lets you apply commands to multiple ports at once — much faster than configuring each port individually. SW1 gets the same treatment.
Step 5 — Verify After Configuration
SW2(config-if-range)# do sh int status
Port    Name              Status      Vlan  Duplex  Speed   Type
Fa0/1   ##to end host##   connected   1     a-full  a-100   10/100BaseTX
Fa0/2   ##to end host##   connected   1     a-full  a-100   10/100BaseTX
Fa0/3   ##not in use##    disabled    1     auto    auto    10/100BaseTX
Fa0/4   ##not in use##    disabled    1     auto    auto    10/100BaseTX
...
Fa0/24  ##not in use##    disabled    1     auto    auto    10/100BaseTX
Gig0/1  ## To SW1 ##      connected   1     full    1000    10/100/1000BaseTX
Gig0/2                    notconnect  1     auto    auto    10/100/1000BaseTX
Every port now has a description. Fa0/3 through Fa0/24 are disabled — shut down and clearly labeled. Gig0/1 shows full duplex and 1000 speed, confirming the manual config took. Clean and locked down.

Step 5 — Save the Configuration
SW2# write
Building configuration...
[OK]
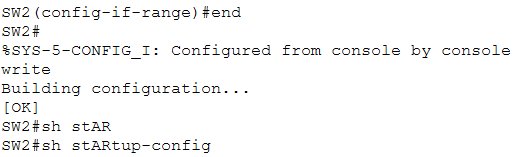
Same done on SW1 and R1.
Key Takeaways
- Manually set speed and duplex on links between network devices (routers, switches) — auto-negotiation can cause duplex mismatches which kills performance
- Leave speed/duplex as auto on ports connected to end hosts — PCs and servers negotiate correctly on their own
interface rangeis essential for switch work — configure dozens of ports in one go instead of one at a time- Shut down unused ports — an open switch port is an easy entry point for someone to plug in unauthorized devices.
shutdown+ a##not in use##description makes intent clear show interfaces statusis the best quick-look command for switches — shows port status, VLAN, duplex, speed, and descriptions all in one tabledisabledin the status column means the port was manually shut down — different fromnotconnectwhich just means nothing is plugged in